1 2 3 4 5 6 7 8 9 float fade = 1 - saturate(fwidth(i.uv) * 60 ); float blur = _Blur * 7 * (1 - drops.z * fade); float 2 projUv = i.grabUv.xy / i.grabUv.w; projUv += drops.xy * _Distortion * fade;
Shader练习1 - Haokai Qin's Vis Gallery
基础定义
https://blog.csdn.net/seek_yang/article/details/106262779
基础光照模型的实现
https://blog.csdn.net/Liuees/article/details/120208166
雨水 涟漪
https://zhuanlan.zhihu.com/p/83219238 https://zhuanlan.zhihu.com/p/182459720
雨痕玻璃:水雾模糊 + 雨滴轨迹
[推荐] https://www.youtube.com/watch?v=EBrAdahFtuo https://blog.csdn.net/weixin_42872938/article/details/104156154
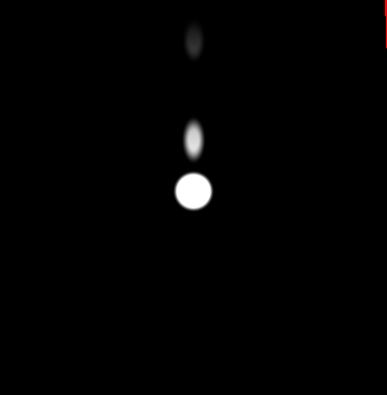
雨滴轨迹的制作 首先创建基本的雨滴轨迹。
1 2 3 4 5 6 7 8 9 10 11 12 13 14 15 16 17 18 19 20 21 22 23 24 25 26 27 28 29 30 31 32 33 34 35 36 37 38 39 40 41 42 43 44 45 46 47 48 49 50 51 52 53 54 55 56 57 58 59 60 61 62 63 64 v2f vert(appdata v) { v2f o; o.vertex = UnityObjectToClipPos(v.vertex); o.uv = TRANSFORM_TEX(v.uv, _MainTex); o.grabUv = UNITY_PROJ_COORD(ComputeGrabScreenPos(o.vertex)); UNITY_TRANSFER_FOG(o,o.vertex); return o; } fixed4 frag(v2f i) : SV_Target { float 4 col = 0 ; float 2 uv = i.uv * _Size; float 2 gv = frac(uv) - .5 ; float t = _Time.y * 0 + _T; uv.y += t * .25 ; float x = 0 ; float y = -sin(t + sin(t + sin(t) * .5 )) * .45 ; float 2 dropPos = (gv - float 2(x, y)) ; float drop = S(.05 , .03 , length(dropPos)); col += drop; float 2 trailPos = (gv - float 2(x, t* .25 )); trailPos.y = (frac(trailPos.y * 4 ) -.5 ) / 8 ; float trail = S(.03 , .01 , length(trailPos)); trail *= S(-.05 , .05 , dropPos.y); trail *= S(.5 , y, gv.y); col += trail; col += drop; if (gv.x > .48 || gv.y > .49 ) col = float 4(1 ,0 ,0 ,1 ); return col;
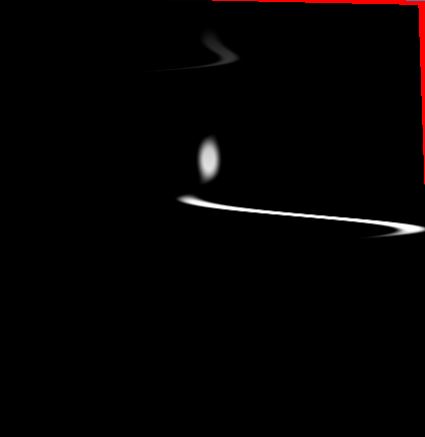
接下来,让雨滴的方向产生变化。
1 2 3 4 5 float w = i.uv.y * 10 ; float x = sin (3 * w)* pow(sin (w), 6 )* .45 ; float y = - sin (t + sin (t + sin (t) * .5 )) * .45 ; y - = (gv.x - x)* (gv.x - x);
随后,添加一段拖尾效果。
1 2 3 4 5 6 7 8 9 10 11 float frogTrail = S(-.05 , .05 , drop Pos .y); frogTrail *= S(.5 , y, gv.y); trail *= frogTrail; frogTrail *= S(.05 , .04 , abs(drop Pos .x)); // trail *= S(-.05 , .05 , drop Pos .y); // trail *= S(.5 , y, gv.y); col += frogTrail * .5 ;
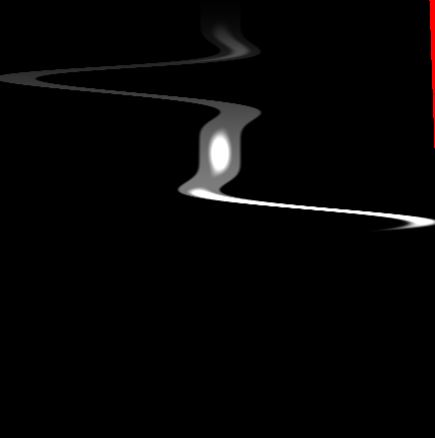
接下来,为雨滴拖尾增加一个范围(雨滴轨迹上没有雾气的区域)。
1 2 3 4 5 6 7 8 9 float fade = 1 - saturate(fwidth(i.uv) * 60 ); float blur = _Blur * 7 * (1 - drops.z * fade); float 2 projUv = i.grabUv.xy / i.grabUv.w; projUv += drops.xy * _Distortion * fade;
接下来,为雨滴增加折射(偏移采样其他位置的纹理)。
1 2 3 4 5 6 7 float2 offs = drop * dropPos + trail * trailPos; col= tex2D(_MainTex ,i .uv +offs * _Distortion ) ; return float3(offs, frogTrail);
水雾模糊 1 2 3 4 5 6 7 8 9 10 11 12 13 14 15 16 blur *= 0.01 ; const float numSamples = 16 ; float a = N21 (i.uv) * 6.18 ; for (float i = 0 ; i < numSamples; i++) { float2 offs = float2 (sin (a),cos (a)) * blur; float d = frac (sin ((i + 1 ) * 546. ) * 5425. ); d = sqrt (d); offs *= d; col += tex2D (_GrabTexture,projUv + offs); a++; }
完整代码
1 2 3 4 5 6 7 8 9 10 11 12 13 14 15 16 17 18 19 20 21 22 23 24 25 26 27 28 29 30 31 32 33 34 35 36 37 38 39 40 41 42 43 44 45 46 47 48 49 50 51 52 53 54 55 56 57 58 59 60 61 62 63 64 65 66 67 68 69 70 71 72 73 74 75 76 77 78 79 80 81 82 83 84 85 86 87 88 89 90 91 92 93 94 95 96 97 98 99 100 101 102 103 104 105 106 107 108 109 110 111 112 113 114 115 116 117 118 119 120 121 122 123 124 125 126 127 128 129 130 131 132 133 134 135 136 137 138 139 140 141 142 143 144 145 146 147 148 149 150 151 152 153 154 155 156 157 158 159 160 161 162 163 164 165 166 167 168 169 170 171 172 173 174 175 176 177 178 179 180 181 182 183 184 185 186 187 188 189 190 191 192 193 194 195 196 197 198 199 200 201 202 203 204 205 206 207 208 209 210 211 Shader "Custom/RainedGlassEffects" { Properties { _MainTex("Texture" , 2 D) = "white" {} _Size("Size" ,float ) = 1 _t ("Time" ,float ) = 1 _Distortion("Distortion" ,Range (-5 ,5 )) = 1 _Blur("blur" ,range (0 ,1 )) = 0 } SubShader { Tags { "RenderType" = "Opaque" "Queue" = "Transparent" } LOD 100 GrabPass{"_GrabTexture" } Pass { CGPROGRAM #pragma vertex vert #pragma fragment frag #pragma multi_compile_fog #define S(a,b,c) smoothstep(a,b,c) #include "UnityCG.cginc" struct appdata { float4 vertex : POSITION; float2 uv : TEXCOORD0; }; struct v2f { float2 uv : TEXCOORD0; float4 grabUv : TEXCOORD1; UNITY_FOG_COORDS (1 ) float4 vertex : SV_POSITION; }; sampler2D _MainTex,_GrabTexture; float4 _MainTex_ST; float _Size,_t , _T,_Distortion,_Blur; float4 offsets; v2f vert (appdata v) { v2f o; o.vertex = UnityObjectToClipPos (v.vertex); o.uv = TRANSFORM_TEX (v.uv, _MainTex); o.grabUv = UNITY_PROJ_COORD (ComputeGrabScreenPos (o.vertex)); UNITY_TRANSFER_FOG (o,o.vertex); return o; } float N21 (float2 p) { p = frac (p * float2 (123.34 ,345.45 )); p += dot (p,p + 34.345 ); return frac (p.x * p.y); } float3 Layer (float2 UV, float t) { float4 col = 0 ; float2 aspect = float2 (2 , 1 ); float2 uv = UV * _Size * aspect; uv.y += t * 0.25 ; float2 gv = frac (uv) - .5 ; float2 id = floor (uv); float n = N21 (id); t += n*6.18 ; float w = UV.y * 10 ; float x = (n - .5 ) * .8 ; x += (.4 - abs (x)) * sin (3 * w) * pow (sin (w), 6 ) * .45 ; float y = -sin (t + sin (t + sin (t) * .5 )) * .45 ; y -= (gv.x - x) * (gv.x - x); float2 dropPos = (gv - float2 (x, y)) / aspect; float drop = S (.05 , .03 , length (dropPos)); float2 trailPos = (gv - float2 (x, t * .25 )) / aspect; trailPos.y = (frac (trailPos.y * 8 ) - 0.5 ) / 8 ; float trail = S (.03 , .01 , length (trailPos)); float frogTrail = S (-.05 , .05 , dropPos.y); frogTrail *= S (.5 , y, gv.y); trail *= frogTrail; frogTrail *= S (.05 , .04 , abs (dropPos.x)); col += frogTrail * .5 ; col += trail; col += drop; if (gv.x > .48 || gv.y > .49 ) col = float4 (1 , 0 , 0 , 1 ); float2 offs = drop * dropPos + trail * trailPos; return float3 (offs, frogTrail); } fixed4 frag (v2f i) : SV_Target { float t = fmod (_Time.y + _t ,7200 ); float4 col = 0 ; float3 drops = Layer (i.uv,t); drops += Layer (i.uv * 1.11 + 8.43 ,t); float fade = 1 - saturate (fwidth (i.uv) * 60 ); float blur = _Blur * 7 * (1 - drops.z * fade); float2 projUv = i.grabUv.xy / i.grabUv.w; projUv += drops.xy * _Distortion * fade; blur *= 0.01 ; const float numSamples = 16 ; float a = N21 (i.uv) * 6.18 ; for (float i = 0 ; i < numSamples; i++) { float2 offs = float2 (sin (a),cos (a)) * blur; float d = frac (sin ((i + 1 ) * 546. ) * 5425. ); d = sqrt (d); offs *= d; col += tex2D (_GrabTexture,projUv + offs); a++; } col /= numSamples; return col * 0.9 ; } ENDCG } } }
题外话,关于bloom 模糊效果当然也可以在后效阶段处理。
https://catlikecoding.com/unity/tutorials/advanced-rendering/bloom/
较复杂的玻璃计算
https://blog.csdn.net/qq_32468649/article/details/79992819
进阶:BRDF shader
If you like this blog or find it useful for you, you are welcome to comment on it. You are also welcome to share this blog, so that more people can participate in it. If the images used in the blog infringe your copyright, please contact the author to delete them. Thank you !